
From Python Notebook to Production: The Smallest Possible MLOps Pipeline
Most data science projects die in a notebook

You run a few cells, get a nice ROC curve, maybe a pretty confusion matrix. Everyone nods in the meeting. Then someone asks the dangerous question: “So… when can this go into production?”
That’s the moment many people freeze—not because the model is too complex, but because the path from notebook to production feels mysterious and heavy: CI/CD, Kubernetes, feature stores, monitoring, and a dozen new tools.
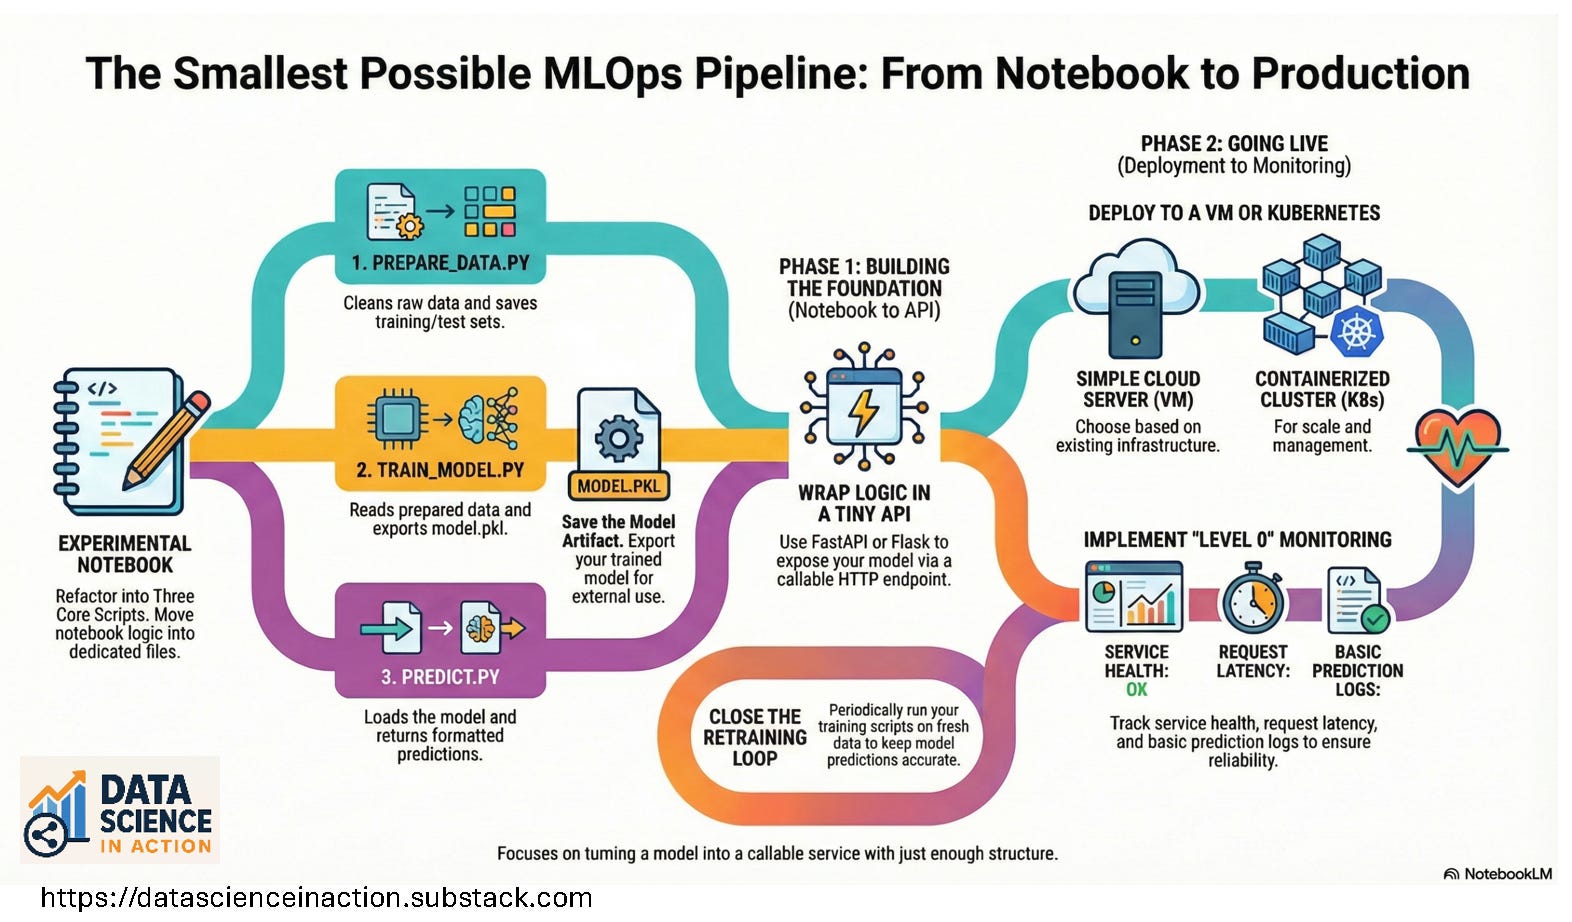
In this article, I’ll walk you through the smallest possible MLOps pipeline: a clear path that takes you from a notebook model to a real, callable service with just a handful of steps. No buzzword soup. No giant platform. Just enough structure to ship.
The Core Idea: A Tiny End‑to‑End Loop
Before diving into code or tools, let’s define what “production” means here.
In this minimal setup, production is:
“Your model is running as a service that other systems can call reliably.”
That’s it. Not “perfectly monitored,” not “fully automated CI/CD,” not “enterprise‑grade MLOps.” Just: it runs, it can be called, and it produces useful predictions.
We’ll build the smallest loop that supports that:
Prepare data.
Train a model.
Save the model.
Expose it through an API.
Run it somewhere more permanent than your notebook.
Add just enough logging to know it’s alive.
Think of it as moving from a personal science lab to a small neighborhood clinic: still simple, but people can actually use it.
Diagram 1: The Minimal MLOps Loop
You can render this as ASCII in Substack or replace it with a simple image:
text[Raw Data]
|
v
[Prepare Data Script]
|
v
[Train Model Script] --> [model.pkl]
|
v
[API Service]
|
v
[Client Apps]
Step 0 — Start in a Notebook (Where You’re Comfortable)
We start where you already are: in a notebook.
Pick a small supervised learning task—for example, predicting whether a customer will churn based on a few features. Use any public CSV or internal dataset you’re allowed to work with.
In your notebook, you typically:
Load data with Pandas.
Select a few features and a target.
Split into train/test.
Train a simple model (logistic regression, random forest, etc.).
Evaluate it with a basic metric (accuracy, F1, AUC—pick one).
Maybe plot a confusion matrix or feature importance.
If you’re teaching or learning, you can do this in a zero‑installation environment like Google Colab or another browser‑based notebook platform—exactly the kind of tools I discussed in my earlier piece, “Python Pandas & Notebook LM”:
https://datascienceinaction.substack.com/p/python-pandas-and-notebook-lm
You can link it in the text as:
If you want a quick refresher on getting started in the browser with Pandas and AI‑powered notebooks, check out my post: Python Pandas & Notebook LM.
The only new requirement for our pipeline is this:
At the end of the notebook, you save your trained model to disk.
For example, with scikit‑learn:
import joblib

joblib.dump(model, "model.pkl")
Now you have an artifact that code outside the notebook can load and use.
Step 1 — Refactor Notebook Code into Three Simple Scripts
The first MLOps mindset shift is moving from exploratory cells to small, reusable scripts.
You don’t need a framework. Start with just three files:
prepare_data.pytrain_model.pypredict.py
1. prepare_data.py — Get Clean Data
This script:
Reads raw data from a source (CSV, database, object storage).
Cleans and transforms it (handles missing values, basic feature engineering).
Writes out a clean file like
train.csv/test.csvor saves a prepared dataset somewhere accessible.
At the bottom:
if __name__ == "__main__":
    # load raw data
    # clean it
    # save train.csv and test.csv
2. train_model.py — Train and Save
This script:
Reads the prepared data from Step 1.
Trains a model (the same logic you had in your notebook).
Saves
model.pkl.
if __name__ == "__main__":
    # read train.csv
    # train model
    # save model.pkl
3. predict.py — Load and Predict
This script will be reused by your API:
Loads
model.pklonce at import time.Exposes a
predict(input_data)function that returns predictions in a consistent format.
For example:
import joblib
import numpy as np

model = joblib.load("model.pkl")

def predict(features: dict):
    # turn features dict into the right array/order
    x = np.array([[features["age"], features["income"], features["num_logins"]]])
    prob = model.predict_proba(x)[0, 1]
    return {"churn_probability": float(prob)}
Diagram 2: From Notebook to Scripts
[Notebook]
   |   (copy logic out)
   v
prepare_data.py   train_model.py   predict.py
         |               |              |
         v               v              v
   clean data        save model     reusable predict()
At this point, you can already run:
bashpython prepare_data.py
python train_model.py
and then, in a Python shell:
from predict import predict
predict({"age": 42, "income": 55000, "num_logins": 3})
You’ve separated experimentation from pipeline steps, which is a huge milestone.
Step 2 — Wrap the Model in a Tiny API
Now we need other systems to talk to your model. They don’t care about notebooks or Python shells; they care about HTTP.
Use a minimal web framework like FastAPI or Flask. Here’s a tiny FastAPI app in app.py:
from fastapi import FastAPI
from pydantic import BaseModel
from predict import predict

app = FastAPI()

class Features(BaseModel):
    age: int
    income: float
    num_logins: int

@app.get("/health")
def health():
    return {"status": "ok"}

@app.post("/predict")
def predict_endpoint(features: Features):
    result = predict(features.dict())
    return result
Run it locally with:
bashuvicorn app:app --reload
Now you can call:
GET /healthto check if the service is alive.POST /predictwith a JSON body to get a prediction.
Example request:
jsonPOST /predict
{
"age": 42,
"income": 55000,
"num_logins": 3
}
Example response:
json{
"churn_probability": 0.18
}
At this point, your model has become a service. Backends, dashboards, and even simple curl commands can use it.
Step 3 — Run It Somewhere More Permanent Than Your Laptop
Running uvicorn on your laptop is great for development and demos, but we want something others can access and rely on.
There are two “smallest” options, depending on your comfort level.
Option A — Single VM / Simple Server
This is the gentlest next step:
Provision a small server (cloud VM, on‑prem machine, etc.).
Copy your code and
model.pklthere (via Git, SCP, or any deployment method you like).Create a Python virtual environment and install dependencies.
Run
uvicornbehind a process manager (for example,systemd) so it restarts if it crashes.Optionally, put NGINX or another reverse proxy in front to handle HTTPS and routing.
For many internal tools and early‑stage products, this is “production enough” to start delivering value.
Option B — A Tiny Kubernetes Deployment
If you already work with Kubernetes—or want to connect this article to your cluster‑focused content—you can take one small step further.
High‑level steps:
Write a simple Dockerfile:
FROM python:3.11-slim
WORKDIR /app
COPY requirements.txt .
RUN pip install -r requirements.txt
COPY . .
CMD ["uvicorn", "app:app", "--host", "0.0.0.0", "--port", "8000"]
Build and push the image to a registry.
Create a Deployment and Service in your cluster with a single replica.
Expose it internally or via an Ingress.
Here’s where you can link to your Kubernetes‑related posts:
When you mention storage (for example, where logs or models live), reference your tutorial “[Tutorial] How to use Rancher Provisioner to streamline Local Storage” as a concrete example of configuring storage in a Kubernetes cluster:
https://datascienceinaction.substack.com/p/how-to-use-rancher-provisioner-toWhen you touch on access control (“who can deploy,” “who can access the service”), point readers to “[Tutorial] How to Configure K8s RBAC? (Part 2)” for a step‑by‑step walkthrough of Kubernetes RBAC concepts and configuration:
https://datascienceinaction.substack.com/p/tutorial-how-to-configure-k8s-rbac-162
Step 4 — Add a Tiny Monitoring and Logging Layer
You don’t need a full observability stack on day one, but you do need some visibility. Otherwise, you’re guessing.
Here’s a minimal monitoring checklist:
Log requests and predictions
Inpredict_endpoint, log the input and output (carefully, if the data is sensitive). Even a simple log file is a big improvement over nothing.Basic counters
Count how many predictions you serve per hour or per day. You can log these counts or expose them via a simple/metricsendpoint later.Latency
Measure how long each prediction takes. Wrap thepredictcall in a timer and log the duration. It will help you catch slowdowns early.Health checks
Your/healthendpoint should confirm that the model is actually loaded and the service is ready. On Kubernetes, this endpoint doubles as a liveness/readiness probe for your Deployment.
All of this can live in the same app.py for now. You’re still minimal, but you’re no longer blind.
Step 5 — Close the Loop: Retraining and Updating
Once your model is serving predictions, the next natural question is: “How do we keep it fresh?”
Because you already separated logic into scripts, you now have a simple retraining loop:
Run
prepare_data.pyon fresh data (manually at first, later via a scheduler).Run
train_model.pyto train a new model and overwrite (or version)model.pkl.Restart your API process so it loads the new model at startup.
At the beginning, you can do this completely manually—for example, once a week or once a month. When it starts to feel repetitive, you can:
Add a cron job that runs the scripts at scheduled times.
Add a lightweight CI/CD pipeline that rebuilds your Docker image and rolls out a new Deployment.
Think of this as “Level 0 MLOps”: manual but controlled. For many teams, this is far more realistic than aiming for a fully automated, multi‑region setup on day one.
A One‑Page Mental Model
Let’s compress everything into a single diagram you can keep in your head (and in your slides).
text ┌─────────────────────────────────────────┐
│ EXPERIMENTATION │
│ Notebook: explore, visualize, iterate │
└─────────────────────────────────────────┘
|
v
┌─────────────────────────────────────────┐
│ PIPELINE SCRIPTS │
│ prepare_data.py -> clean data │
│ train_model.py -> model.pkl │
│ predict.py -> predict(input) │
└─────────────────────────────────────────┘
|
v
┌─────────────────────────────────────────┐
│ API SERVICE │
│ app.py + FastAPI/Flask │
│ /health, /predict │
└─────────────────────────────────────────┘
|
v
┌─────────────────────────────────────────┐
│ DEPLOYMENT ENVIRONMENT │
│ Single VM or Kubernetes Deployment │
└─────────────────────────────────────────┘
|
v
┌─────────────────────────────────────────┐
│ LOGGING + MONITORING + RETRAINING │
│ Logs, basic metrics, periodic retrain │
└─────────────────────────────────────────┘
You don’t have to build every layer at once. Each block is already a big upgrade from “a lonely notebook on my laptop.”
Stop at the layer that solves your current problem:
If you just need reproducibility, the scripts might be enough.
If you need other teams to call your model, add the API.
If you need reliability and scale, move to a VM or cluster and layer in logging and retraining.
Where to Go Next
If you want to grow this minimal pipeline into something more powerful, here are the natural next steps for you and your readers:
Use zero‑installation platforms and AI-paired-programming tools to speed up the development of your scripts and APIs. You can link to your post “Best Zero‑Installation Platforms for Teaching AI Pair Programming” here as a practical guide to environments that make experimentation and teaching easier:
https://datascienceinaction.substack.com/p/best-zeroinstallation-platforms-forDeepen your Kubernetes practice with storage and RBAC, using:
– “[Tutorial] How to use Rancher Provisioner to streamline Local Storage” for storage and volumes:
https://datascienceinaction.substack.com/p/how-to-use-rancher-provisioner-to
– “[Tutorial] How to Configure K8s RBAC? (Part 2)” for permissions and roles:
https://datascienceinaction.substack.com/p/tutorial-how-to-configure-k8s-rbac-162Revisit fundamentals and long‑term thinking about data science work by connecting this practical pipeline to your broader reflections on doing impactful technical work (for example, your post on publishing a technical book and thinking about structure, scope, and audience):
https://datascienceinaction.substack.com/p/what-are-the-steps-to-publish-a-technical
But you don’t need any of that to get started.
If you can:
Save a model from your notebook,
Wrap it in a tiny API, and
Run that API somewhere other people can reach,
Then you already have your first MLOps pipeline—small, simple, and very much in action.